A collaboration with Jackson Greene.
Goal
Set up Hardware vDPA on a ConnectX-6 Dx network interface card (NIC) with OVS-Kernel using ASAP² OVS Offload as defined (we think) in the Overview section of the NVIDIA docs below. This is not Software vDPA using DPDK. The terms are confusing.
Also set up standard SR-IOV for comparison purposes, so that differences in network performance (throughput, latency, and power efficiency) can be evaluated.
Reference Material
The following two webpages helped us a great deal in figuring this out:
- Configure VM with vDPA interface🔹1
- Simple list of setup steps.
- NVIDIA MLNX_OFED Documentation v24.04-0.7.0.0🔹
- Particularly the OVS-Kernel Hardware Offloads and VirtIO Acceleration through Hardware vDPA sections.
- Despite saying it’s up to date at the bottom, we found several aspects of this documentation to be out-of-date and confusing for our purposes, but it was still useful.
For background information on vDPA, VirtIO, and SR-IOV, these Notion notes🔹 and the useful pages it links to might be helpful.
BIOS Configuration
These settings need to be enabled in BIOS to get SR-IOV and vDPA working:
- Enable Virtualisation (may be called VT-x).
- Enable IOMMU (may be called VT-d).
- Enable global SR-IOV (and SR-IOV for each NIC or NIC port if needed).
We used Dell R630s Dell R740s with Rocky Linux 9.4 as our hosts (initial setup was on R630s, but we found they weren’t powerful enough to handle the NIC’s maximum throughput).
Kernel and System Configuration
On Rocky 9 we want to update the kernel and set the required kernel options (IOMMU support and disabled SELinux). We disable SELinux to prevent issues with file permissions.
dnf install elrepo-release epel-release
dnf update
dnf -y install wget nano tar git pciutils

# Note: this disables SELinux
sudo grubby --update-kernel=ALL --args="intel_iommu=on iommu=pt pci=realloc selinux=0"
reboot now
Upgrade ConnectX-6 Dx Firmware
Our ConnectX-6 Dx 2-port 100GbE QSFP56 PCIe Adapter cards were manufactured by Dell with PSID: DEL0000000027 (found with ibv_devinfo | grep board_id). You supposedly should be able to automatically update the firmware using mlxfwmanager --online -u -d 0000:82:00.0 (bus number found with lspci | grep Mellanox), but this didn’t work for us.
Relevant links:
mkdir ~/downloads; cd ~/downloads
wget --user-agent="Chrome" http://dl.dell.com/FOLDER10854540M/1/Network_Firmware_80VVK_LN_22.39.10.02.BIN
chmod +x Network_Firmware_80VVK_LN_22.39.10.02.BIN

./Network_Firmware_80VVK_LN_22.39.10.02.BIN
reboot now
Install Mellanox Drivers
mkdir ~/downloads; cd ~/downloads
wget "https://content.mellanox.com/ofed/MLNX_OFED-24.04-0.7.0.0/MLNX_OFED_LINUX-24.04-0.7.0.0-rhel9.4-x86_64.tgz"
tar -xvzf MLNX_OFED_LINUX-24.04-0.7.0.0-rhel9.4-x86_64.tgz
cd MLNX_OFED_LINUX-24.04-0.7.0.0-rhel9.4-x86_64

# NOTE: might need to change kernel-devel-x so it's the latest one in future? automate it instead
dnf -y install tcl tk unbound perl autoconf lsof kernel-rpm-macros automake rpm-build libtool patch gcc-gfortran
dnf -y install kernel-devel-$(uname -r)

./mlnxofedinstall --all --distro rhel9.4 --add-kernel-support --dpdk --ovs-dpdk --skip-repo
dracut -f
/etc/init.d/openibd restart
Installing Mellanox drivers like this should also install a NVIDIA version of Open vSwitch (OVS) for us to use. Our OVS config can be seen here.
Installing QEMU
QEMU-KVM is what we’ll use to run our VMs.
This should be all you need to do:
dnf install qemu-kvm qemu-img libvirt libvirt-client virt-install bridge-utils
ln -s /usr/libexec/qemu-kvm /usr/bin/qemu-system-x86_64
Alternatively, you can build it yourself. The NVIDIA documentation says to do this, but we found this unnecessary. Here’s how we did it nonetheless:
mkdir ~/builds; cd ~/builds

dnf config-manager --enable crb
dnf install -y ninja-build glib2-devel pixman-devel

python3 -m ensurepip
pip3 install meson

git clone https://git.qemu.org/git/qemu.git
cd qemu && git checkout origin/stable-9.0
mkdir build && cd build/ && ../configure --enable-vhost-vdpa --enable-vnc --target-list=x86_64-softmmu --enable-kvm && make -j $(nproc) && make install

sudo sed -i 's/#user = "qemu"/user = "root"/' /etc/libvirt/qemu.conf && \
sudo sed -i 's/#group = "qemu"/group = "kvm"/' /etc/libvirt/qemu.conf
systemctl restart libvirtd
# Close and reopen virt-manager also

echo "user should be root, group should be kvm: "
cat /etc/libvirt/qemu.conf | grep "user ="
cat /etc/libvirt/qemu.conf | grep "group ="
Configure VFs, vDPA devices, and OVS
PF: Physical Function (PCIe hardware port) VF: Virtual Function (feature of SR-IOV)
0000:82:00.X here is the PCIe bus info retrieved using lspci | grep Mellanox or lshw -businfo -c network. Yours may have a bus number other than 82. 0000:82:00.0 and 0000:82:00.1 are the PFs, representing the two hardware ports. We get the mlx5 device to create two VFs, 82:00.2 and 82:00.3, on PF 82:00.0.
If the MAC addresses you’ve assigned to the vDPA devices conflict with other vDPA devices you’ve already created on machines in that network then you may get difficult to debug errors.
# Remove previous config
ovs-vsctl del-br cxbr0
/usr/share/openvswitch/scripts/ovs-ctl stop
echo 0 > /sys/bus/pci/devices/0000:82:00.0/mlx5_num_vfs
echo 0 > /sys/bus/pci/devices/0000:82:00.1/mlx5_num_vfs

# Load kernel modules
modprobe vhost_vdpa

# Set PF to switchdev mode, create VFs .2 and .3
devlink dev eswitch set pci/0000:82:00.0 mod switchdev
echo 2 > /sys/bus/pci/devices/0000:82:00.0/mlx5_num_vfs

# Create vDPA devices
# max_vqp: max virtqueue pairs (corresponds to `queues=16` in QEMU command)
vdpa dev add name vdpa0 mgmtdev pci/0000:82:00.2 mac 52:54:00:cb:45:11 max_vqp 16
vdpa dev add name vdpa1 mgmtdev pci/0000:82:00.3 mac 52:54:00:cb:45:22 max_vqp 16

# Debug prints to check stuff was created properly
lshw -businfo -c network
vdpa dev show
ls /dev/vhost-vdpa*

# Start OVS, create bridge, and configure
/usr/share/openvswitch/scripts/ovs-ctl start
ovs-vsctl add-br cxbr0
ovs-vsctl add-port cxbr0 enp130s0f0np0
ovs-vsctl add-port cxbr0 eth0
ovs-vsctl add-port cxbr0 eth1
ovs-vsctl show
ip link set cxbr0 up
ip addr add 192.168.101.2/24 dev cxbr0
enp130s0f0np0 was what our PF network interface was named. It should not be assigned an IP.
eth0 and eth1 were the two VF representor interfaces created automatically for each VF when switchdev mode was enabled. Their IPs are the ones set, in a later section, to the vDPA-VirtIO device inside the corresponding VM.
For comms between nodes/machines using vDPA to work, the PF needs to be in the OVS bridge alongside the VF representors.
ASAP² OVS Offload
This should be all you have to do to offload the OVS data plane to the ConnectX NIC, yielding an easy gain in throughput and efficiency:
ovs-vsctl set Open_vSwitch . other_config:hw-offload=true
/usr/share/openvswitch/scripts/ovs-ctl restart
Troubleshooting
switchdev
If you get this error trying to change to switchdev mode, then your firmware may be out of date (e.g. we had to upgrade from Dell 22.27.61.06 to 22.39.10.02):
Error: mlx5_core: Failed setting eswitch to offloads.
kernel answers: Invalid argument
Also, routing standard (non-vDPA) SR-IOV traffic through a physical switch (instead of OVS) didn’t work for us in switchdev mode. Switch it off with devlink dev eswitch set pci/0000:82:00.0 mod legacy after disabling all VFs.
Networking
A mistake which delayed us for days was assigning a MAC address to the VFs, e.g. ip link set enp130s0f0np0 vf 0 mac 00:11:22:33:44:00 (where enp130s0f0np0 is a PF). This mistake was made because we were led astray by this→blog→series2, which has great diagrams and explanations but is seemingly out of date or doesn’t apply ot us. Note that the first two posts use DPDK, which we do not use here.
If any issues arise, double check that the PFs, VFs, and VF representors have their link state set to up with ip link (e.g. check for <...,UP,LOWER_UP>).
Final Result
For comparison purposes, this is what our host-side vDPA configuration looked like.3
[root@eyebergjr ~]# lshw -businfo -c network
Bus info          Device         Class          Description
===========================================================
pci@0000:01:00.0  eno1           network        Ethernet Controller X710 for 10GbE SFP+
pci@0000:01:00.1  eno2           network        Ethernet Controller X710 for 10GbE SFP+
pci@0000:01:00.2  eno3           network        Ethernet Controller X710 for 10GbE SFP+
pci@0000:01:00.3  eno4           network        Ethernet Controller X710 for 10GbE SFP+
pci@0000:82:00.0  enp130s0f0np0  network        MT2892 Family [ConnectX-6 Dx]
pci@0000:82:00.1  enp130s0f1np1  network        MT2892 Family [ConnectX-6 Dx]
pci@0000:82:00.2  enp130s0f0v0   network        ConnectX Family mlx5Gen Virtual Function
pci@0000:82:00.3  enp130s0f0v1   network        ConnectX Family mlx5Gen Virtual Function
pci@0000:82:00.0  eth0           network        MT2892 Family [ConnectX-6 Dx]
pci@0000:82:00.0  eth1           network        MT2892 Family [ConnectX-6 Dx]

[root@eyebergjr ~]# vdpa dev show
vdpa0: type network mgmtdev pci/0000:82:00.2 vendor_id 5555 max_vqs 17 max_vq_size 256
vdpa1: type network mgmtdev pci/0000:82:00.3 vendor_id 5555 max_vqs 17 max_vq_size 256

[root@eyebergjr ~]# ls /dev/vhost-vdpa*
/dev/vhost-vdpa-0  /dev/vhost-vdpa-1

[root@eyebergjr ~]# ovs-vsctl list Open_vSwitch
_uuid               : 9c859a7c-b8c8-44fe-b8c8-a84dd578ec51
bridges             : [99532786-292f-414d-bea5-fd3c9cd3bebf]
cur_cfg             : 5
datapath_types      : [netdev, system]
datapaths           : {}
db_version          : "8.3.1"
doca_initialized    : false
doca_version        : none
dpdk_initialized    : false
dpdk_version        : "MLNX_DPDK 22.11.2404.0.11"
external_ids        : {hostname=eyebergjr, rundir="/var/run/openvswitch", system-id=""}
iface_types         : [bareudp, erspan, geneve, gre, gtpu, internal, ip6erspan, ip6gre, lisp, patch, stt, system, tap, vxlan]
manager_options     : []
next_cfg            : 5
other_config        : {hw-offload="true"}
ovs_version         : "2.17.8+nvidia.e92ac07"
ssl                 : []
statistics          : {}
system_type         : rocky
system_version      : "9.4"

[root@eyebergjr ~]# ovs-vsctl show
9c859a7c-b8c8-44fe-b8c8-a84dd578ec51
    Bridge cxbr0
        Port cxbr0
            Interface cxbr0
                type: internal
        Port eth1
            Interface eth1
        Port eth0
            Interface eth0
        Port enp130s0f0np0
            Interface enp130s0f0np0
    ovs_version: "2.17.8+nvidia.e92ac07"
SR-IOV
vDPA is essentially a superset of SR-IOV. This means setting it up on the host side is just the same but with less steps. There’ll be no VF representors, as legacy mode is used instead of switchdev.
# Remove previous config
ovs-vsctl del-br cxbr0
/usr/share/openvswitch/scripts/ovs-ctl stop
echo 0 > /sys/bus/pci/devices/0000:82:00.0/mlx5_num_vfs
echo 0 > /sys/bus/pci/devices/0000:82:00.1/mlx5_num_vfs

# Set PF to *legacy* mode (the default), create VFs .2 and .3
devlink dev eswitch set pci/0000:82:00.0 mod legacy
echo 2 > /sys/bus/pci/devices/0000:82:00.0/mlx5_num_vfs

# Debug prints to check stuff was created properly
lshw -businfo -c network
Notably, you do not need OVS at all. You use SR-IOV to give the VM direct access to the NIC, so no intermediary is required. We even found that two VMs on the same host could communicate without going through the physical switch. We don’t know how that works.
Create Rocky 9 VM Image
The instructions below create a Rocky 9 image with the password for root access removed. The image comes with default Mellanox mlx5 drivers that allow for standard SR-IOV to be used without installing anything extra (see relevant NVIDIA docs here🔹 and here🔹). If you want or need custom drivers (e.g. from NVIDIA), then you can temporarily use NAT networking as mentioned in the end # NOTE: comment, or you can transfer downloads to the VM’s partition.
Run these commands one by one, otherwise it may not work.
cd ~/downloads
wget https://dl.rockylinux.org/pub/rocky/9/images/x86_64/Rocky-9-GenericCloud.latest.x86_64.qcow2 -O rocky9-base.qcow2
sudo modprobe nbd

# Create devices to represent qcow2 disk
qemu-nbd -c /dev/nbd0 /root/downloads/rocky9-base.qcow2

# Mount the partition
mkdir /mnt/rocky9; mount /dev/nbd0p4 /mnt/rocky9

# Edit root password to be empty to avoid needing cloud-init
sed -i '1s/.*/root::19937:0:99999:7:::/' /mnt/rocky9/etc/shadow

# Unmount parition
umount /mnt/rocky9 && rm -df /mnt/rocky9

# End process to allow other processes to use the image
pkill qemu-nbd

# Create a copy of the disk for each VM
cp rocky9-base.qcow2 rocky9-vhost-vdpa-0.qcow2
cp rocky9-base.qcow2 rocky9-vhost-vdpa-1.qcow2

# NOTE: If you want to install additional packages you should boot the base disk image (rocky9-base.qcow2) with NAT networking.
# You can then install any packages or download any files needed.
# After shutting down the VM you would need to remove the existing VM disk images (rocky9-vhost-vdpa-0.qcow2 and rocky9-vhost-vdpa-1.qcow2)
# Then run the above copy commands again to create new VM disk images with the updates.
Note that Rocky 9 isn’t required. For example, you could use Alpine instead (replace -hda /root/downloads/temp/vdpa_rocky9_0.qcow2 in the QEMU command below with -cdrom /root/alpine.iso).
Run Example VMs
For vDPA, make sure that the MAC assigned to the VM’s virtio-net device is the same as the MAC assigned to the vDPA device when it was created.
It’s easier at first to use virt-manager, but using QEMU directly provides more control.
QEMU
The below VM resource allocations are for the Intel R740s.
vDPA
Run the Rocky 9 VMs using our vDPA network devices.
If using the custom built QEMU, then cd ~/builds/qemu/build and use ./qemu-system-x86_64.
# Start VM 1
qemu-system-x86_64 \
    -enable-kvm \
    -cpu host \
    -smp 16,sockets=16,cores=1,threads=1 \
    -m 32G \
    -hda ~/downloads/rocky9-vhost-vdpa-0.qcow2 \
    -netdev type=vhost-vdpa,vhostdev=/dev/vhost-vdpa-0,queues=16,id=vhost-vdpa0 \
    -device virtio-net-pci,mq=true,vectors=34,netdev=vhost-vdpa0,page-per-vq=on,disable-legacy=on,mac=52:54:00:cb:45:11 \
    -nographic \
    2>&1 | tee vdpa-vm1.log

# In VM 1
nmcli device set eth0 managed no
ip a add 192.168.101.20/24 dev eth0 && ip l set eth0 up
# Start VM2 in a new terminal tab / window
qemu-system-x86_64 \
    -enable-kvm \
    -cpu host \
    -smp 16,sockets=16,cores=1,threads=1 \
    -m 32G \
    -hda ~/downloads/rocky9-vhost-vdpa-1.qcow2 \
    -netdev type=vhost-vdpa,vhostdev=/dev/vhost-vdpa-1,queues=16,id=vhost-vdpa1 \
    -device virtio-net-pci,mq=true,vectors=34,netdev=vhost-vdpa1,page-per-vq=on,disable-legacy=on,mac=52:54:00:cb:45:22 \
    -nographic \
    2>&1 | tee vdpa-vm2.log

# In VM 2
nmcli device set eth0 managed no
ip a add 192.168.101.21/24 dev eth0 && ip l set eth0 up
Some additional context for mq=true, vectors=34, page-per-vq=on, and disable-legacy=on can be found in this ChatGPT chat🔹 (standard LLM disclaimers apply). mq=true in particular was critical for improving performance.
# From VM 0
ping 192.168.101.2 -c 3
ping 192.168.101.21 -c 3

iperf -s
# From VM 1
ping 192.168.101.2 -c 3
ping 192.168.101.20 -c 3

iperf -c 192.168.101.20 -t 30 -i 2
SR-IOV
modprobe mlx5_vfio_pci

# Find hardware ID of Mellanox PF and VF and unbind the VFs
lspci -nnk -s 0000:82:00.*
echo 0000:82:00.2 | sudo tee /sys/bus/pci/devices/0000:82:00.2/driver/unbind
echo 0000:82:00.3 | sudo tee /sys/bus/pci/devices/0000:82:00.3/driver/unbind

# Bind the PF and VF to the vfio driver
echo 15b3 101d | sudo tee /sys/bus/pci/drivers/mlx5_vfio_pci/remove_id
echo 15b3 101e | sudo tee /sys/bus/pci/drivers/mlx5_vfio_pci/remove_id
echo 15b3 101d | sudo tee /sys/bus/pci/drivers/mlx5_vfio_pci/new_id
echo 15b3 101e | sudo tee /sys/bus/pci/drivers/mlx5_vfio_pci/new_id

# Check that the vfio driver is now used instead of mlx5_core
lspci -nnk -s 0000:82:00.*
Start and set up the VMs as with vDPA, but using these QEMU commands (here the same disk images are being used, but you could create new ones):
# Start VM 1
qemu-system-x86_64 \
    -enable-kvm \
    -cpu host \
    -smp 16,sockets=16,cores=1,threads=1 \
    -m 32G \
    -hda ~/downloads/rocky9-vhost-vdpa-0.qcow2 \
    -device driver=vfio-pci,host=0000:82:00.2 \
    -net none \
    -nographic \
    2>&1 | tee sriov-vm1.log

# In VM 1
nmcli device set eth0 managed no
ip a add 192.168.101.20/24 dev eth0 && ip l set eth0 up
# Start VM2 in a new terminal tab / window
qemu-system-x86_64 \
    -enable-kvm \
    -cpu host \
    -smp 16,sockets=16,cores=1,threads=1 \
    -m 32G \
    -hda ~/downloads/rocky9-vhost-vdpa-1.qcow2 \
    -device driver=vfio-pci,host=0000:82:00.3 \
    -net none \
    -nographic \
    2>&1 | tee sriov-vm2.log

# In VM 2
nmcli device set eth0 managed no
ip a add 192.168.101.21/24 dev eth0 && ip l set eth0 up
-net none is to prevent the default network interface from being created.
# From VM 0
ping 192.168.101.2 -c 3
ping 192.168.101.21 -c 3

iperf -s
# From VM 1
ping 192.168.101.2 -c 3
ping 192.168.101.20 -c 3

iperf -c 192.168.101.20 -t 30 -i 2
virt-manager
Use the same in-VM commands as above to turn off NetworkManagaer, set the IP address, and initiate pings.
You can replace the QEMU emulator path in the VM’s combined XML config with the path of the custom compiled QEMU if you built one.
<domain type="kvm">
  <name>vdpa-rocky9-1</name>
  ...
  <os>
    <type arch="x86_64" machine="pc-q35-rhel9.4.0">hvm</type>
    <boot dev="hd"/>
  </os>
  ...
  <devices>
    <emulator>/usr/libexec/qemu-kvm</emulator>
    ...
  </devices>
</domain>
vDPA
Replace the NIC hardware XML config with one of the following interface definitions. Change the last 2 values of the MAC address as necessary.
<interface type="vdpa">
  <mac address="52:54:00:cb:45:11"/>
  <source dev="/dev/vhost-vdpa-0"/>
  <model type="virtio"/>
  <driver queues="8"/>
</interface>
<interface type="vdpa">
  <mac address="52:54:00:cb:45:22"/>
  <source dev="/dev/vhost-vdpa-1"/>
  <model type="virtio"/>
  <driver queues="8"/>
</interface>
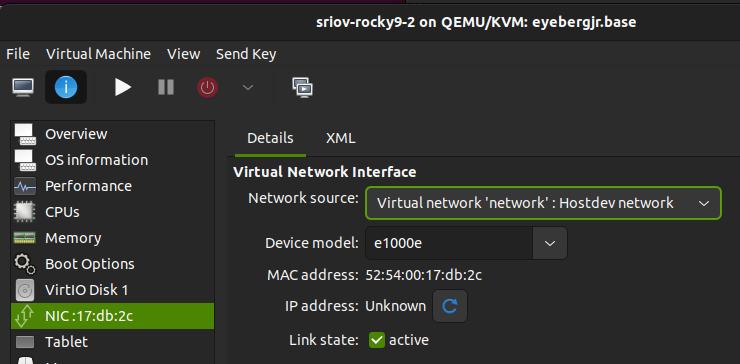
SR-IOV
Create an SR-IOV pool hostdev virtual network for one of the PFs in virt-manager.
Creating the hostdev network (SR-IOV pool).

Assign the hostdev network to the VM using e1000e. Using this, virt-manager will automatically pick one VF from the pool of available VFs on that PF.
Basic Experimental Results
We ran iperf to measure, as a simple baseline, throughput between two VMs on two different hosts (i.e. over the wire) within the same server rack.
Recall that we are using Dell R740 servers with Rocky 9 hosts and Rocky 9 VMs with 16 CPU cores and 32 GB of RAM.
| Virtualization ( hw-offload) |
Bandwidth (Gbit/s) |
Notes |
|---|---|---|
| SR-IOV | 80 | |
| vDPA (true) | ~67–70 | Mostly 70–75, sometimes 50–65. |
| vDPA (false) | 28 |
SR-IOV provides maximal throughput, thanks to direct hardware passthrough. However, vDPA does not require hardware-specific NIC drivers to be installed in the guest VM, making both management and live migration much simpler.